Get Started with Dendro
In this tutorial we will go through all the steps needed to run your first data processing job on Dendro, from scratch:
- Register and start a Compute Resource hosted on dandihub.
- Install an app for spike sorting using the Mountainsort5 algorithm.
- Create a project and import assets from DANDI Archive.
- Run jobs.
- Visualize results on Neurosift.
Register and start a Compute Resource
First, you'll need to register a Compute Resource. Compute Resources are the compute environments where your Dendro jobs will run, you can read about it in more details here.
Setting up a Compute Resource is a one-time step, and you can re-use the same Compute Resource later on for all your projects. For this tutorial, we will setup a Compute Resource on dandihub, a cloud-based platform that provides a free environment for running lightweight Dendro jobs.
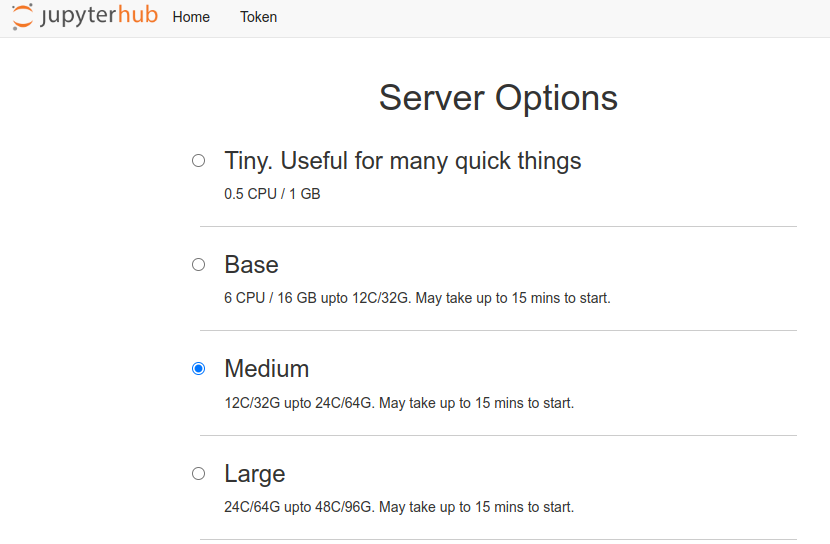
1. Start an instance on dandihub
We suggest a Medium instance, which has 12 CPUs and 32GB of memory. This might take a few minutes to start.
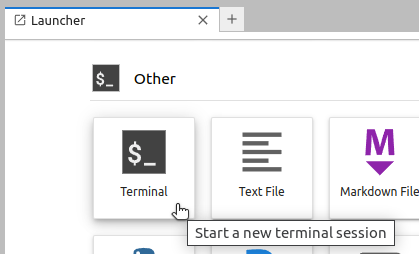
2. Start a terminal session
Within the Jupyter Lab environment, start a Terminal.
3. Setup the environment for Dendro using the terminal.
Create a new directory and navigate to it:
mkdir dendro && cd dendro
Install Dendro:
pip install dendro[compute_resource]
Set the environment variable CONTAINER_METHOD to apptainer:
export CONTAINER_METHOD=apptainer
4. Register a Compute Resource using the terminal.
dendro register-compute-resource
Click on the link provided, which will redirect you to the Dendro UI in a new browser tab.
Choose a name for the compute resource, e.g. tutorial-cr, and click on Register.
5. Start the Compute Resource using the terminal.
You can now start the Compute Resource using the terminal.
dendro start-compute-resource
You sould see the message Compute resource is running.
Obs.: You can stop the Compute Resource with CTRL+C.
✅ Congratulations! You have successfully registered and started a Compute Resource for Dendro platform.
Install apps
Dendro encapsulates advanced data processing algorithms into apps. Apps are installed to a Compute Resource, and can be used in multiple projects.
With your Compute Resource up and running, you can now install data processing apps to it, using the Dendro UI:
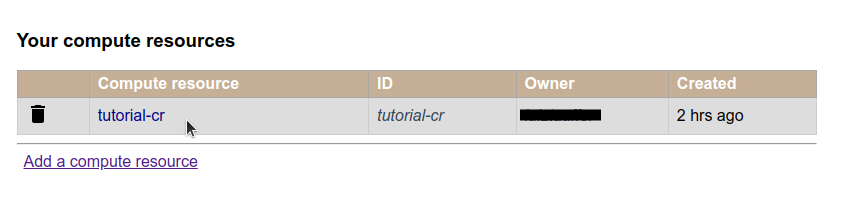
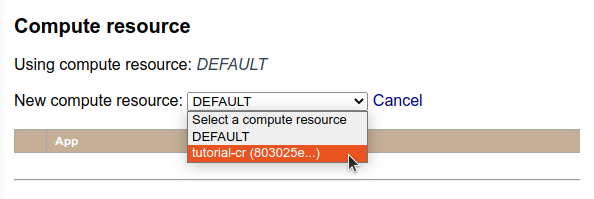
1. Select the Compute Resource.
Click on Configure compute resources, at the top right corner.

Then choose the Compute Resource you just created.
2. Add an app.
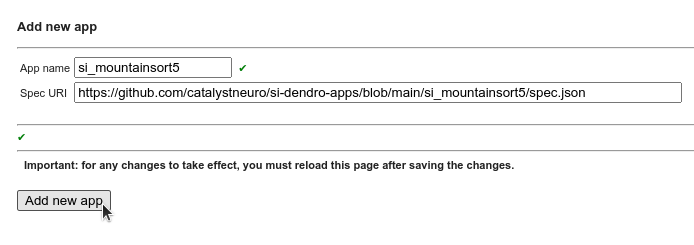
Under Apps section, click on Add app. You will be prompted to enter the app's name and the URL pointing to the spec file.
For this tutorial, we will use the SpikeInterface Pipeline - Mountainsort5 app to perform spike sorting on an electrophysiology dataset.
The app spec file is located at https://github.com/catalystneuro/si-dendro-apps/blob/main/si_mountainsort5/spec.json.
3. Verify that the app was successfully installed.
Looking back at the dandihub terminal, you should see a success message indicating that the app was successfully installed, similar to the following:
Loading app https://github.com/catalystneuro/si-dendro-apps/blob/main/si_mountainsort5/spec.json
URL: https://raw.githubusercontent.com/catalystneuro/si-dendro-apps/main/si_mountainsort5/spec.json?cachebust=xxxxxxxxxxxxxxxxxxxxxxxxx
  processors: spikeinterface_pipeline_mountainsort5
✅ Great! You have successfully installed an app to your Compute Resource. This means you can now run jobs using this app, in this Compute Resource.
Create projects and import dandisets
In Dendro, projects are the main organizational unit for a given collection of imported data and outputs from jobs. A project can contain multiple dandisets and use different compute resources.
Let's create a project and choose a Compute Resource for it:
1. Create a new project.
Click on Manage projects, at the top right corner:

At the projects management page, click on Create a new project and choose a name for it, e.g. tutorial-project. You should be redirected to the new project's page.
2. Select a Compute Resource for the project.
At the project’s page, under Compute Resource, click on Select a different compute resource for this project, and select the compute resource you just created in the previous steps.
Projects can contain multiple dandisets, which can be imported from DANDI Archive directly through the Dendro UI. Let's import a dandiset to your Dendro project:
3. Add a dandiset to the project.
Click on DANDI Import, at the left side navigation menu, then click on Add new dandiset to project. Enter the dandiset ID, e.g. 000409, and click on OK.

Now all the assets from this dandiset will be available to be imported into your project.
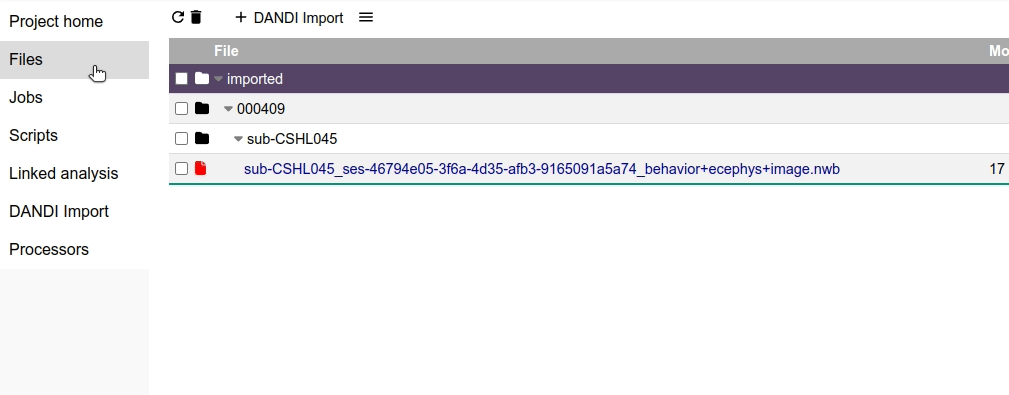
4. Import assets from a dandiset.
A dandiset can contain hundreds of assets, and you need to select which ones you want to import to your project. For this tutorial, we will import a single NWB file from the dandiset 000409.
Choose the sub-CSHL045/sub-CSHL045_ses-46794e05-3f6a-4d35-afb3-9165091a5a74_behavior+ecephys+image.nwb file and click on Import selected assets.

✅ Well done! You have successfully created a project and imported a dandiset asset to it. Now it's time to run a job using this file.
Run Dendro jobs
Up to this point, you have:
- Registered and started a Compute Resource
- Installed a spike sorting app to the Compute Resource
- Created a project and imported a dandiset asset to it
Next, we will run a spike sorting job on the imported file:
1. Select the file with the source data.
Navigate to the Files page, select the file you just imported, and click on Spike sorting.
Next, click on spikeinterface_pipeline_mountainsort5 processor, this should open the job configuration screen.
At this point, you can take some time to explore the vast number of parameters available for the job.
2. Explore the job parameters.
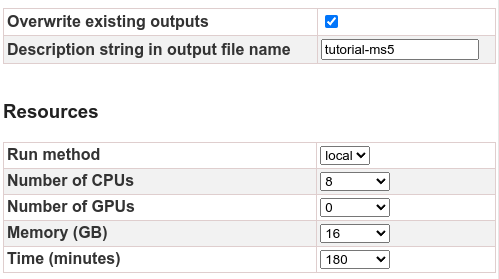
The left side form contains the job parameters:
Run method- defines where the job will run.Number of CPUs- the number of CPUs to be used by the job.Number of GPUs- the number of GPUs to be used by the job.Memory- the amount of memory to be used by the job.Time- the maximum time the job can run.
For this tutorial, you should leave the default values for these parameters.
Change the Description string in output file name to something easier to identify the job result files later on, e.g. tutorial-ms5.
3. Explore the processor parameters.
The right side form contains the processor parameters.
For the spikeinterface_pipeline_mountainsort5 processor there are many parameters that can be configured to customize the spike sorting job. Here are some examples:
recording_contextcontains parameters for the interface with the input file. E.g. you can make this job just a quick try run by checkingstub_test.preprocessing_contextcontains parameters for the preprocessing steps, including signal filtering, detection of bad channels and motion correction.spikesorting_contextcontains parameters for the spike sorting algorithmpostprocessing_contextcontains parameters for postprocessing the sorting results, including quality metrics extraction.curation_contextallows you to enter a custom query for curation of the sorting results.
4. Load parameters from file.
Dendro job parameters can be saved to a file and loaded later. This is useful for sharing configurations between users or for running the same job multiple times.
For this tutorial, you can download the parameters file from here.
Click on Load parameters and choose the file you just downloaded.
5. Submit the job.
Click on Submit job(s):

At the Compute Resource terminal, you should see a logged message indicating that the job was successfully submitted:
Starting job xxxxxxxxxxxxx spikeinterface_pipeline_mountainsort5
Running: apptainer exec ...
6. Follow the job progress.
You can follow the job's progress in real time. Navigate to the Jobs page and select the job you just submitted.

A panel will open with the job's details, including:
- General information and status
- Inputs and output files
- Resource utilization (updated in real time)
- Console output logs (updated in real time)
✅ Bravo! You have successfully submitted a spike sorting job on a public electrophysiology dataset!
Visualize results
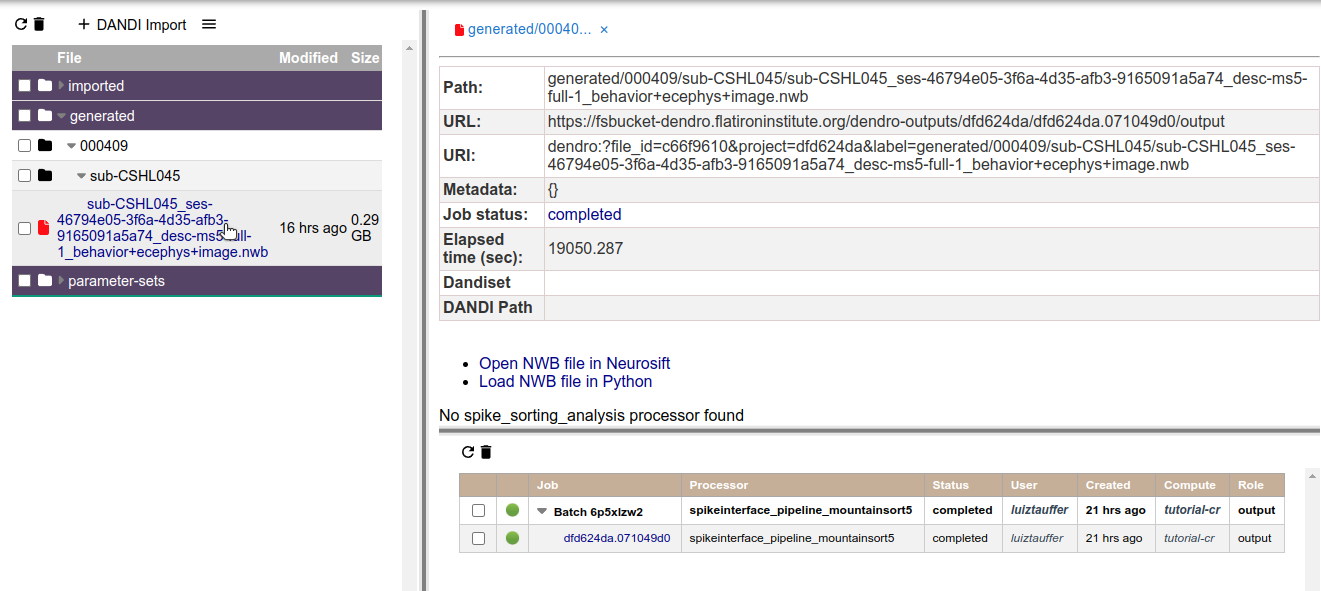
Results are saved as NWB files that can be found under the generated folder of the Files page. You can visualize and explore the results in multiple ways:
1. Check results file information in Dendro.
Clicking on the output NWB file will open a tab with general information:
2. Open results file in Python.
Opening the NWB file is a convenient way to explore the results of the spike sorting job in a Python environment.
Click on Load NWB file in Python, copy the code snippet and run it in a Jupyter notebook on your dandihub instance or on own machine.
This will require the following Python packages to be installed:
- h5py
- pynwb
- dendro
pip install h5py pynwb dendro
3. Open results file in Neurosift.
Neurosift is a web-based platform for visualization of NWB files. It is tightly integrated with Dendro, so you can easily visualize the results of your spike sorting jobs.
Neurosift is capable of combining multiple NWB files into a single visualization, which is useful for exploring the results of Dendro jobs together with the original raw data.
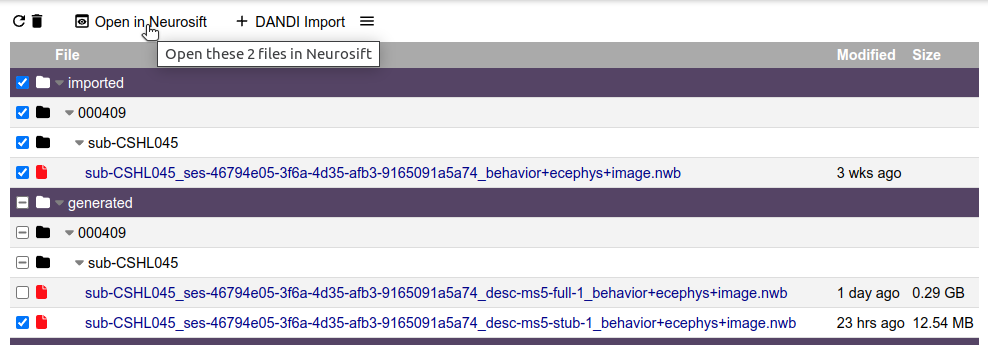
To open the results in Neurosift, mark the checkbox of the two files (the imported and the generated) and click on Open in Neurosift:
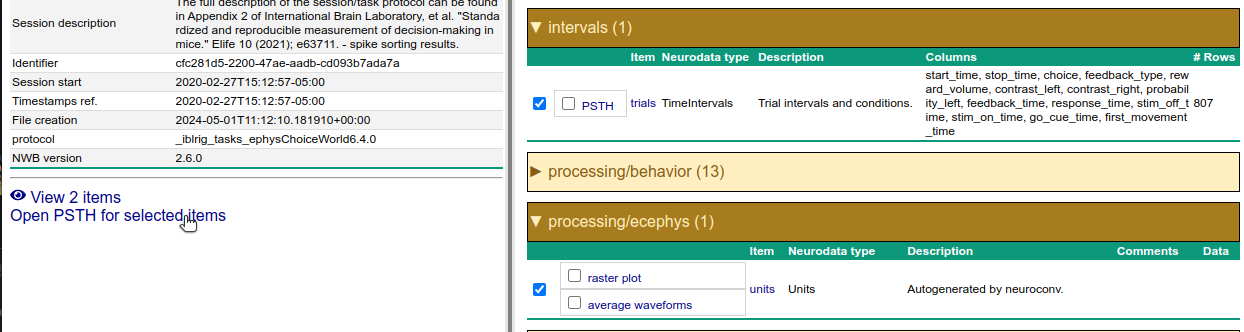
4. Explore results file data on Neurosift. [part 1]
At Neurosift main page, you will see the files metadata at the left side, and the data visualization options at the right side. Neurosift is able to combine the original file data, containing the raw electrophysiology and trials data, with the generated file data, containing the spike sorting results.
Expand the intervals tab and check the the outer checkbox, then expand the processing/ecephys tab and check the outer checkbox. Next, click on Open PSTH for selected items:
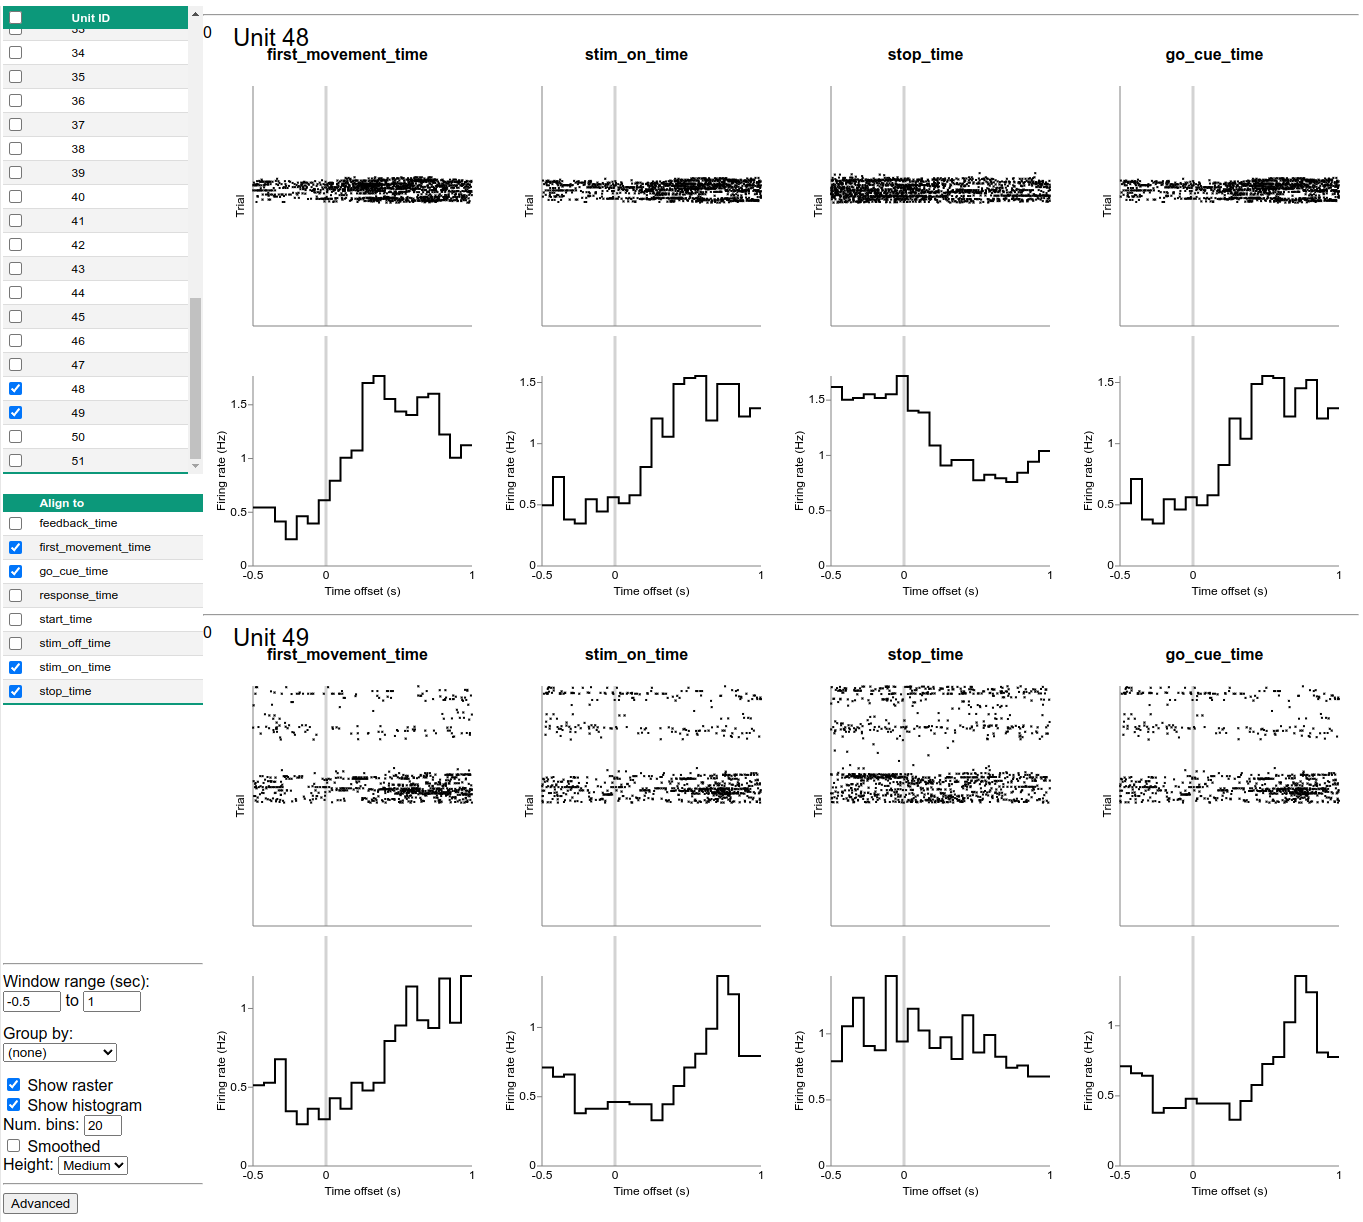
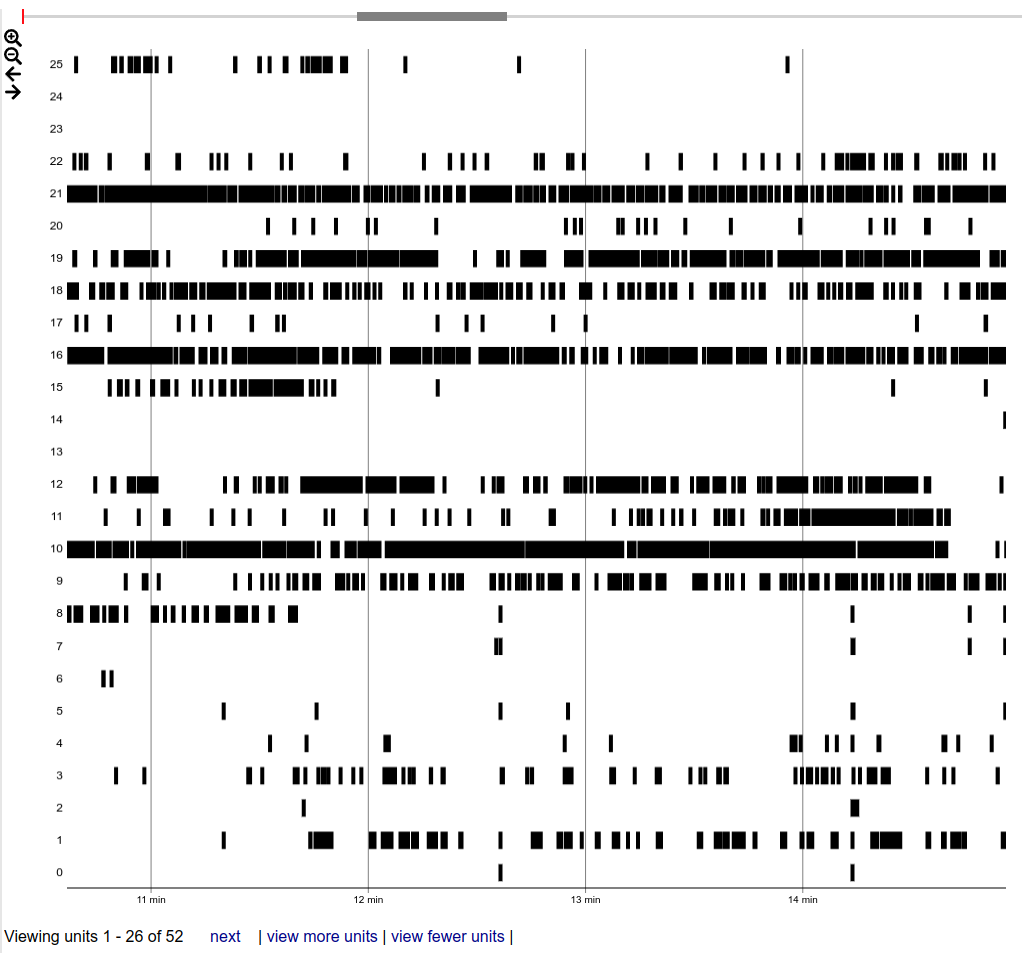
At the PSTH tab, you can see the spike sorting results aligned with the session trials, including the spike raster plot and the peri-stimulus time histogram. Take some time to explore the data, select different units and alignments. Can you find any interesting responses?
5. Explore results file data on Neurosift. [part 2]
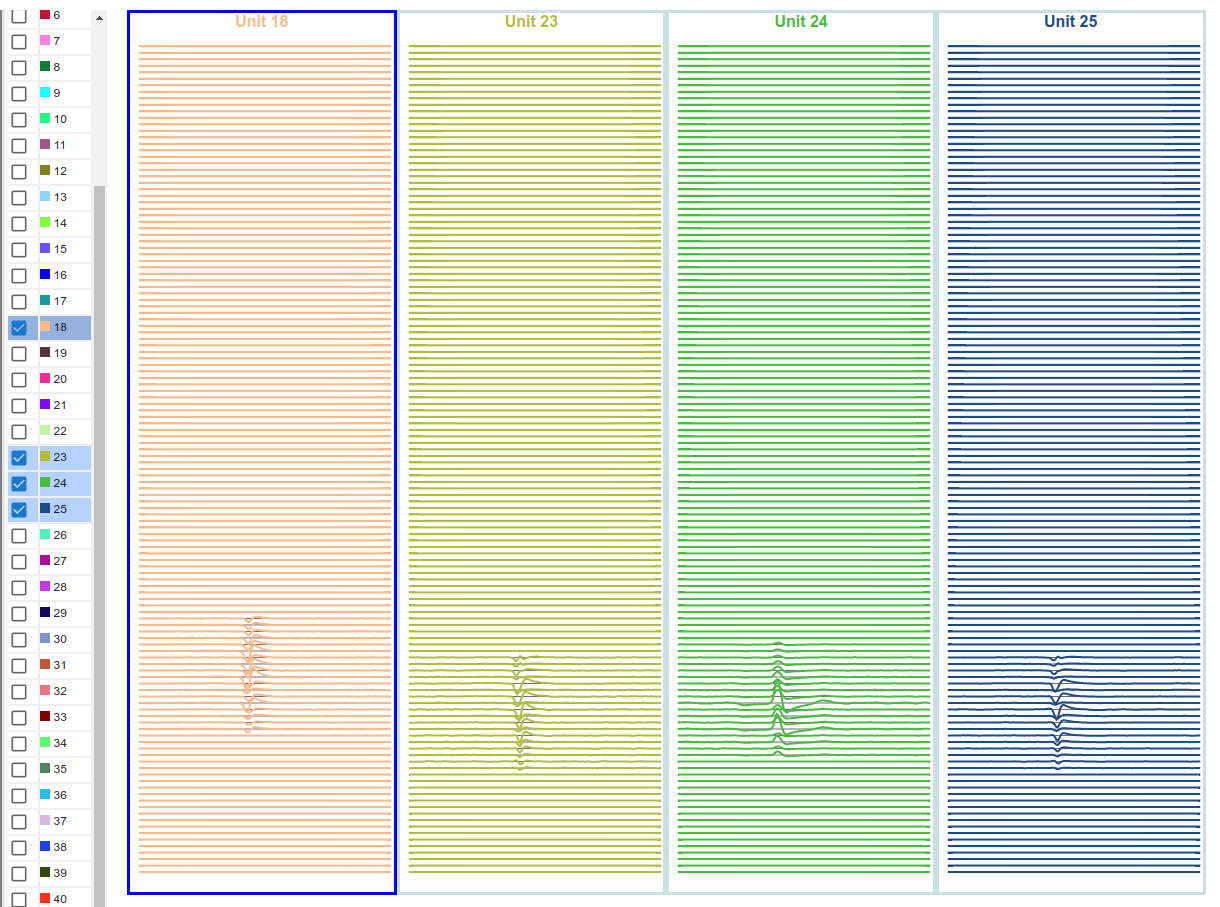
Neurosift provides a wide range of visualization options for exploring the data. Take some time to explore the different tabs and options! Here are some examples of what you can do.
The spikes waveforms plot:
The spiking raster plot:
✅ Now you know how to visualize the results of your Dendro jobs!
What's next?
Good job on completing this tutorial! You have learned the basics of the Dendro platform: how to register and start a Compute Resource, install an app, create a project, import assets, run jobs, and visualize the results.
Check out the advanced sessions to learn more about the Dendro platform and how to use it for your research: